Showing posts with label decorating. Show all posts

Monday, September 15, 2014

Back to School Wreath (Dollar Tree)

If you follow my seasonal board it might look like I am obsessed with wreaths. I am a little, but it is a passing thing. Sometimes I am totally on top of it and sometimes I wave at the opportunity to make a wreath as it fly's by. Sometimes this happens even though I bought the supplies months ago. 

This time however, I was totally on top of it! My back to school wreath:

First I cut a ring out of cardboard. and split it into sections.


Then I glued pencils onto the section dividers This helped me make sure I was gluing the pencils at the same place all the way around.


And then I filled between each section with pencils and crayons. all the way around. (I originally bought the box of 64 crayons at dollar tree, thinking that I didn't want to waste the good ones. It was a total fail, those crayons are all in blue wrappers. I can't even.)


I added a strip on the back for the hanger (I ended up putting a string through it)


And its done!

And it only took me a month to show you!

3 pencil boxes - $1 each
crayons- on hand
cardboard- on hand.

The Artsy Girl

Thursday, July 31, 2014

4th of July wreath- Mini Fail

 I was reading on Dollar Store Crafts that you can tape a pool noodle into a circle and use that to create a wreath! I was all for it when I saw the dollar tree had noodles at the beginning of the summer. Taping it together was easy enough. 


 I collected a bunch of materials at the dollar tree too.

Love me some dollar tree. 
I got started wrapping up my wreath. I was so excited! Then I ran out of ribbon. "No worries" I thought, I bought plenty of 4th of July crap to put on this thing. When I was finished I had this.


As you can see, the circle of the wreath didn't hold well, and is now kind of football shaped. Also, the noodle was GREEN!!!!! I didn't think this was a big deal until I ran out of ribbon and the stars didn't densely cover the noodle. And the duct tape I used was pink.. Again, would have been fine if I had enough ribbon! Since It was midnight July 3rd I put the monster on the front door and went to bed. Then when I was looking for back to school wreath supplies I came across this at the Dollar Tree.


WHAT? Where has this been all my life? I bought 5 just in case they disappear. I took everything off the green monster, and put it on the wire frame. The ribbon almost fit all the way around, and I covered the remainder with that obnoxious plastic bow.


Perfection. Too bad it was late. Oh well. Next year.

Saturday, July 26, 2014

YoCP April (in July)

Yes folks, it's true: I just got around to my April task this week. I'm not going to lie, and back-date this post (I would NEVER) or say I just got around to blogging it. I really am behind. BUT I think you will agree it was worth the wait.

Before:

I took inspiration from this post on Jezebel, and this post on apartment therapy and of course, the floors of the MoMA in NYC.

First I thoroughly cleaned the whole bathroom, just in case I ran out of steam after that, then at lest I would have a clean bathroom. Here it is about half way through.


And the finished product.


Ok, I know that is doesn't super go with the bird theme of all of our stuff, but I don't care, I like all of it. Even together in all its oddness.

If you want to know how to do this, just check out the Jezebel article, It is exactly what I did, so no need to re-hash here. I would say however, that whatever tape she recommends is probably better. I ordered the school specialty brand that I know and love from work, and some of the colors were more transparent than I had ever noticed in my classroom.

Now the question is what to do with the hall/ baby bathroom. it needs to be fun, but adult enough to be the hall bath. I was thinking nautical/pirate, but I already agreed that the next nursery will be shark themed, and I don't want to overkill that. And no that is not an announcement. I am just thinking ahead.

Until Next Time!

Wednesday, May 14, 2014

Baby Room

  Believe it or not, I did eventually finish Munchy's room.


The sanded and painted desk.


My Craft Fail Curtains.

Room Details. 
Crib and Shelves: Ikea.
Bedding/Toy Net: Target
Rocker: Vintage
Desk: Vintage DIY
Art: Vintage and family made.

Monday, March 31, 2014

YoCP March

 I know you thought I forgot about it, but I am totally still doing the Year of the Clean Person, just slowly. I totally failed at the March challenge of making my bed everyday, but I did manage to revamp my sleeping space a little.

Before


After

After


I painted the room gray, (Mark Twain's Boyhood Home by Valspar) used Guitar hooks to hang M's collection, rearranged the furniture, cleared off the dresser, hung art/pictures/ mirror, and made New curtains and a headboard.


 The curtains are the same construction as the ones I used in the condo, but I made two pockets instead of one so there would be a ruffle at the top.


For the headboard I used a big piece of cardboard and wrapped quilt batting and fabric around it. I nailed it to the wall, and added upholstery tacks to the outer edge. 

Unrelated, but I also made a wreath this month.

Thursday, January 23, 2014

Craft room + Year of the Clean Person

I got so much done over Christmas break. If you are my real-life friend you saw my chronicles on   Facebook. My main accomplishment was the craft room:
 
 Also known as the place where everything goes to die.
 It took DAYS, but I cleaned EVERYTHING out, took some to work, threw some away, filed some, reorganized some storage, and even put a table back there for the sewing machine. My white whale is done.
 Closet, storage bins.
 Sewing table, books, pile of sketchbooks (Ok, I still have some work to do.)
 Couldn't get rid of M's Piano :/

I even decorated a little.

It feels good to finally have a room dedicated to art in my new house, despite the fact that I know it will be short lived (Baby #2 will be considered in the next few years) Then I will have to go back to small space, corner of the room crafting.

While I was doing this, and cleaning the whole house, I read on Jezebel about the Year of the Clean Person movement. I have already completed the January task of making a list of goals:
2014 cleaning goals
*Clean Kitchen every night
*Clear surfaces in living/dining areas twice a week
*Sweep/vacuum/ mop once a week
*Dust once a month
*Bathrooms once a month
*Deep clean one room once a month
*Follow all monthly challenges 

It sounded like the list was supposed to include specific things you want to clean, but I spent the entire Christmas Break scrubbing, organizing, purging etc, so my house is in pretty good shape-- all problem areas of last year have been dealt with. I am using this challenge to keep all the hard work from reverting back to a pile of mess by creating habits that will stick. Why am I telling you about this? What does this have to do with my normal blog? Well it's a life style thing, and I know that the mess I live in is directly related to not having any time as a teacher. Plus its my blog, so I can post whatever I want, and I know you will help keep me accountable. I really need to do this though, Munchy ate two dust bunnies yesterday!

In case you don't want to click the link and read the really long post about the schedule, here is a brief recap of the monthly goals, with the things I'm likely to add. 

January- Make a list of goals. I am also going to try to implement my list. I already deep cleaned the craft room!
February- Clean the book shelves. I will add to this the entertainment center and china cabinet (very similar pieces of furniture) Plus I have to baby proof all of it. I'll deep clean the living room this month. as I will have put so much work into it already. 
March- Make your bed everyday! Ugh. I'm also going to deep clean the master bedroom this month, because it is spring break, and I would like to paint that room. 
April- Create your dream bathroom. This is two bathrooms for me. I don't have much money to spend, so I hope I can sell some stuff I have in the garage to finance this (we are trying to pay down the credit cards.) I will focus on the hall bath, as our master is in pretty good shape. I'll deep clean both bathrooms this month (duh)
May- Winter cloths purge. OK so I basically have no cloths, and as a new mom I doubt that will change any time soon. so I'll do my best with that, but I don't think I'll be getting rid of much. my deep clean this month is cleaning all the closets.
June- Car wash. I'll make sure M's gets done too, I'll add deep clean the Garage here, maybe I'll get my laundry area looking like a room.
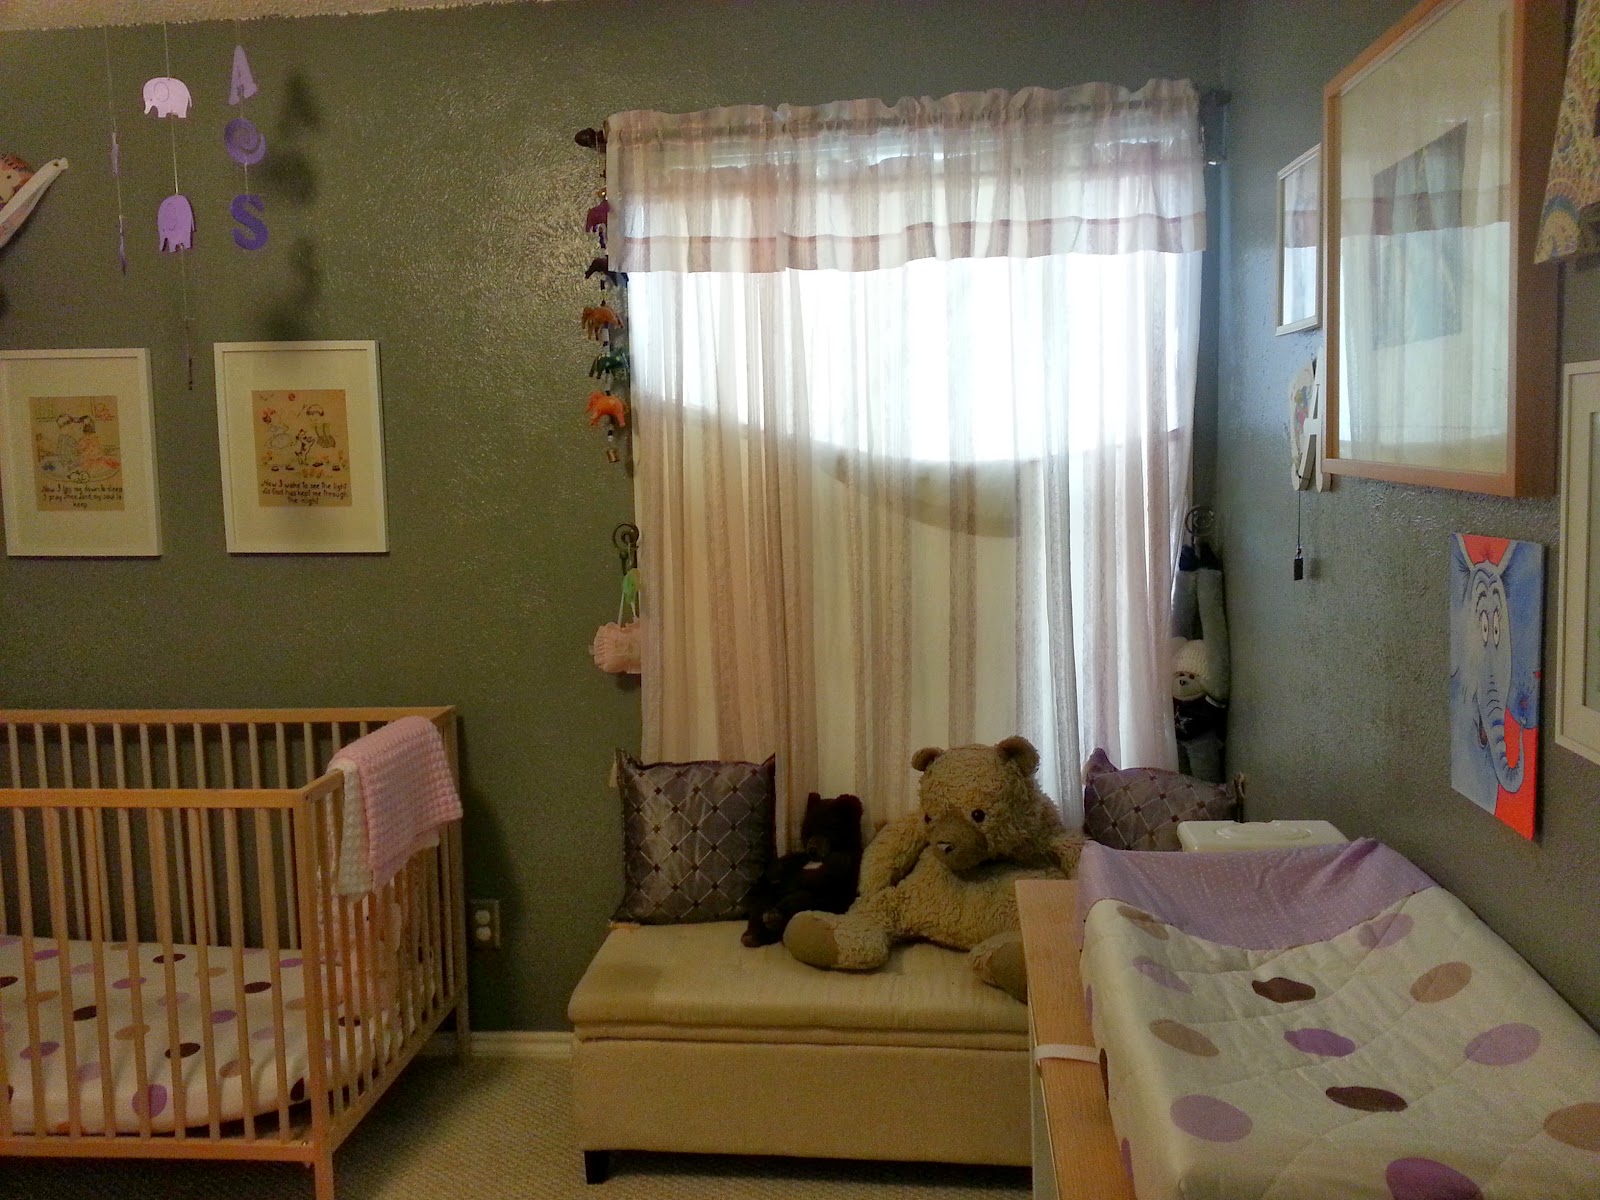
July- Shoe purge, over my dead body. Ok ok, I'll look and see what is out of style or needs to be fixed. Deep clean the baby's room, she has some shoes to get rid of.
August-Clean your desk. This is back to school time. I'll be doing good if I don't drop all the good habits I hope to have created this year. I'll be deep cleaning my classroom, and trying to not let the house explode.
September- Summer cloths purge. It's cute that Jolie thinks I'm not still wearing all my summer cloths in September. She must not live in Texas. I'll get rid of things that don't fit here. Dining room deep clean.
October-Kitchen organization, another task that will potentially cost me way too much money. I would really like to to use counter-top paint on the kitchen this month and get rid of my laminate butcher block counters.  Deep clean Kitchen (duh)
November- Pantry/fridge clean out, I feel like I do this every time I go to the store, but I'll do it.  I'm back to deep cleaning the living room. I guess I'll need to if I am putting a tree up soon.

Well I'll be pricing grout brushes the rest of the day.
What are your goals this year?
TAG

Friday, March 15, 2013

Craft Fail: Ombre Curtians

So you may have deduced from some of my recent posts that I am having a baby in about a week and a half.  It's very exciting, and I think that the combination of  it being spring break, my being too large to do anything efficiently, and the reality that she is almost here is making me start to nest. Or maybe it's because people keep telling me I'll have no time once she arrives.

Anyway,  I was cleaning out the room that is to be her nursery and realized that my purple and grey color scheme is really just grey at this point. I decided a quick fix to that (other then actually hanging the mobile or putting art on the walls) would be to dye the curtains. They were a lovely white, but came with the house so who cares.

After a quick Facebook poll my friends said go for it, and M's cousin mentioned doing it ombre just in case it messed up. I WAS TOTALLY THINKING THE SAME THING! I had read a tutorial on ombre dying fabric on APW before my wedding and thought, OK it seemed easy.

Then I found a tutorial on pinterest:
diy ombre curtains 

Which didn't lead to a tutorial. Maybe I should have gone back to the APW post and re-read it, but when I have an idea I really can't be expected to read things. M and my bro happened to be going out to get supplies for a backyard project, so I tagged along, got my dye and skimmed the directions. I had dyed fabric before (10 years ago) so I was pretty confident in my abilities.

The first issue was that apparently I was doing the whole thing backwards: Putting in a little at a time rather then taking out a little at a time. When I was rinsing the totally not ombre fabric out I also sorta remembered the bottle saying I needed to add vinegar to the dye so it would stick to certain fabrics. hummmmmm.... Did I have one of those fabrics? Who knew, I didn't read the label.


 Luckily I didn't ruin the fabric totally, and they are just pink rather then purple. I think they work just fine, even though it wasn't what I was going for. In person you can see that the stripes of texture are actually more purple, and it still helps the room look more girly. 

What craft have you failed on?
The Artsy Girl


Monday, January 16, 2012

Craft room

I was looking around in my photos and realized that I took pictures of my craft room last time I cleaned it. Thought you might like to see my multipurpose room.


Here is the view from the door. As you can see it is jam packed with stuff! The window box is filled with cat stuff, i.e. food bowl and litter box. We call this Bowser's room.


OK, the main crafting and art making area. That drafting table was like $200 online, I think the brand was Alvin. the desk with the sewing machine is from Sam's club, and the fling cabinet matches. There is an old school overhead projector that I saved from the dumpster at school when a storage room was cleaned out.  The sewing machine is a Babylock Molly. I thought about going more digital, but I figured that I am pretty astute when it comes to taking the machines apart and trouble shooting issues, and that knowledge goes out the window when you get digital. Notice the small guitar, this is also M's music storage room.


The bin's are full of  fabric, and odds and ends like empty bottles that can be used for crafts. That orange loveseat is really a bed for Peach. Not that we ever let her in here, so its a place for people to sit when I make them stuff, or crash when drinking too much.


That TV is not hooked up to anything. I wish it was sometimes, but I can just watch Netflix on my laptop if I want to create and veg. That closet has shelves from Ikea in them and hold all the supplies for creating, along with books. tucked back in the corner where you can't see are all my gift wrapping stuff. 

Yes I know, my craft room is very sad :( someday I will have one that is either large enough for a big table in the middle to create on or that I don't have to share with the cat and all of M's stuff. I want to make a display board for quilting soon, but where will it go?

Time to think!

Saturday, January 14, 2012

Curtains Finally.

Over Christmas break I finally got around to making window treatments for our condo. Yes, we plan on leaving in favor of our very own house someday soon, but M's Grandmother plans on moving back in now that we have the place all fixed up, and I couldn't let her come in with no matching curtains.


Well, they are really valances I guess.  I hear that valances are out of style in home decor these days, but when it comes to something so costly and time consuming to change as homes I say if you still like it who cares.

I told my mom I made them and she said, "hem and pocket?" Yep that's just what I did, but if you are a novice or don't speak "my mom" here is a quick how to:


 I bought a satiny material a few months ago that has a nice texture on one side and a shiny back side.  When I started I kinda forgot that it was satiny and kicked myself when I started working. This isn't the easiest  to work with, and I try to avoid it when I don't NEED to use satin, but oh well.


 The first thing I did was to cut the fabric into strips that were 20 inches wide. I bought 2 yards. of this fabric, and my big window is about 2 yards across so I needed 4 yards of 20 in wide fabric to make my valance scrunchy. My 20in measurement across was completely arbitrary, it just worked out with what I had, which cut three 2 yard strips, and I needed two more yards for another smaller window in the room, so it seemed perfect.  Like my math?


The first thing I did was iron out all the strips, then sew two together for the big window. I pressed the seam just to be sure. 


Then I went to the edges and pined them down, steamed them closed, as satin hems can be tricky, and used a baste stitch on the machine.


 Now time for the "pocket" which is basically a large hem. I think I folded it over so the pocket was 2 1/2 inches wide. I tucked in the fraying end to make it look nice. Yes, I would normally have done that for the hem on the edge too, but the satin was being too finicky.


 Pin and iron all the way down the 4 yards of fabric.


Now sew with a baste stitch. I like to bunch my long fabric up like this so I have more control. (Don't ask about all the glue guns.) Make sure you leave the ends open so that you can slip the rod into the pocket.


 Now for the last bottom hem. For this it really would be wise to tuck in the frayed edges. I spent 2 days when I finished cutting frays that came loose off of the valance. But alas, I got caught in the "I'm almost finished" rush and cut some corners. Luckily no one will be inspecting my work.


Here it is in natural light. I put them on some white rods. So sorry I didn't take pictures of how to slip them in the pocket, but I bet you can figure it out.  I'm sure you can use any kind. I was lucky that there were brackets stuck in the wall when we moved in, and I recognized them as the kind that support the white rods that my mom just replaced in her house. Rather then taking them out and buying new rods and having to re-level I just used the leveling some unknown person did once, and dug two rods out of the trash at her house.

I think these look really nice, despite that my Realtor aunt says that they are outdated. They add some warmth to the room. If I were the kind of person that kept track of the cost of projects then I would say this was about $20.00 since I just had to buy the fabric. But it may have been less then that.

Until next time.