Showing posts with label TAEA. Show all posts

Sunday, August 2, 2015

Weaving TAEA 2015 Mini conference presentation

Hey teacher people! You found it! This is my post that goes along with my presentation for the Region 13 mini conference RECHARGE. I hope between this and the packet of lessons and things we gave you you can find something to do with your kids.HERE is a link to the lesson plans, packet from the conference, and some further reading on weaving.

 Weaving is important because it helps with hand eye coordination, and helps build neural pathways in the brain that nothing else can quite make.  I teach weaving in some form or fashion to just about every grade level most years. It is a great end of the year project. You can just bliss out with your classes making things out of yarn, everyone is usually pretty chill and quiet when weaving. Or you can make it an ongoing project for people to pick up at the end of projects all year.

Here are all of my weaving projects from K-5. Feel free to grade up or down as you see fit. If I do more at any point in the future I will be sure to put them (or link to them) here.

Kindergarten paper weaving
This is a great intro to weaving. You could also do this at the beginning of another weaving project if you were so inclined (in fact I do just that as a review often.)

Start with a sheet of paper

Fold in half

Draw lines about an inch apart

Cut (make sure you leave space at the top.)

It should look like this


Take some inch wide strips

And weave in an under over pattern

Making sure that the pattern works in all directions.


Don't forget to tighten everything up.

Squeeze one last strip in

Glue everything down.

Done!

And here is a lovely video on Youtube of someone making one from start to finish!
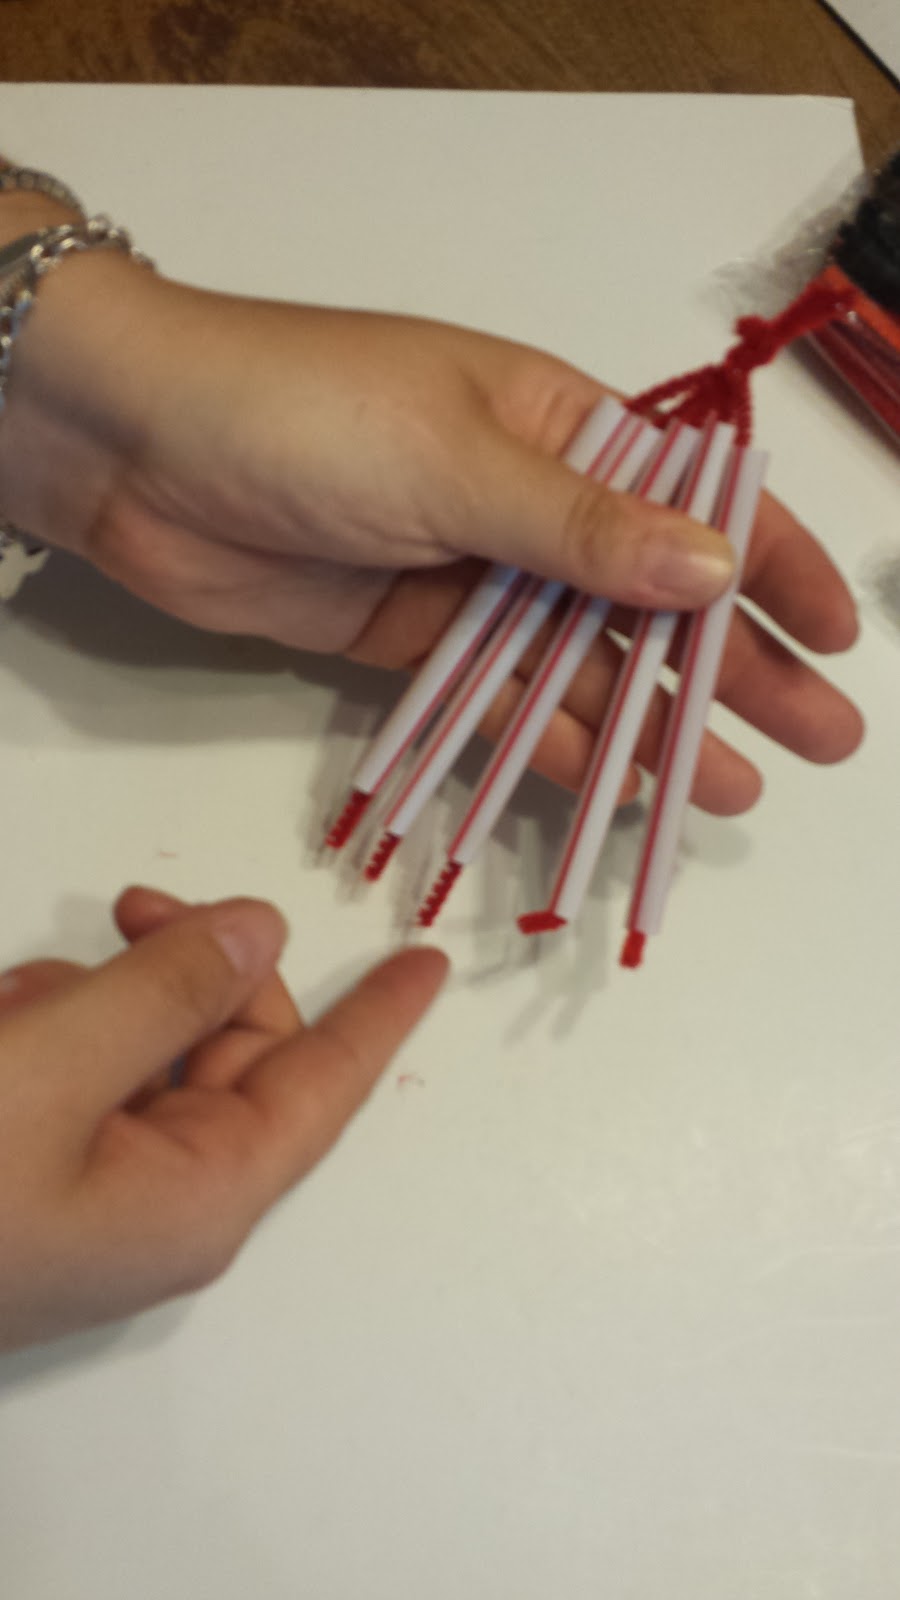
Straw weaving
This can become so many different things, and become quite complex, it just depends on how you teach them.

You need pipe cleaners (or yarn) and straws

put the pipe cleaners in the straws

Twist together the top and kink the ends.

Tie a piece of yarn to the first straw.

Weave over under, over under.

Make sure to weave back the other way too.

Its easy to do it too loose and messy.

Tighten everything up.

Keep going, tie another string on when needed.

Tie off the string when done.

Pull out the straws.

Twist the other side closed.

The lovely Cassie Stevens whose blog you should really be reading made a great video series of the whole process. She uses yarn as the warp, so It is a little different. And here is a video of another way to do this all together.


Circular weaving
Its Circular because of the shape of the weaving when it is done. You can use a square loom if you want, or make it into a circle, or use a plate.

Start with your loom base.

You want an overall odd number of notches around the perimeter. Make sure they are at least finger width apart.

Cut your notches.

Start your weft on the back and then pull it across the front to the opposite side of the loom.

Keep going around until you have one notch left.

You want to loop around that notch so that your warp string ends on the front.

Run the end of your warp under the mess of strings in the middle.

Use itself to tie a knot.

Use the leftover string to begin weaving

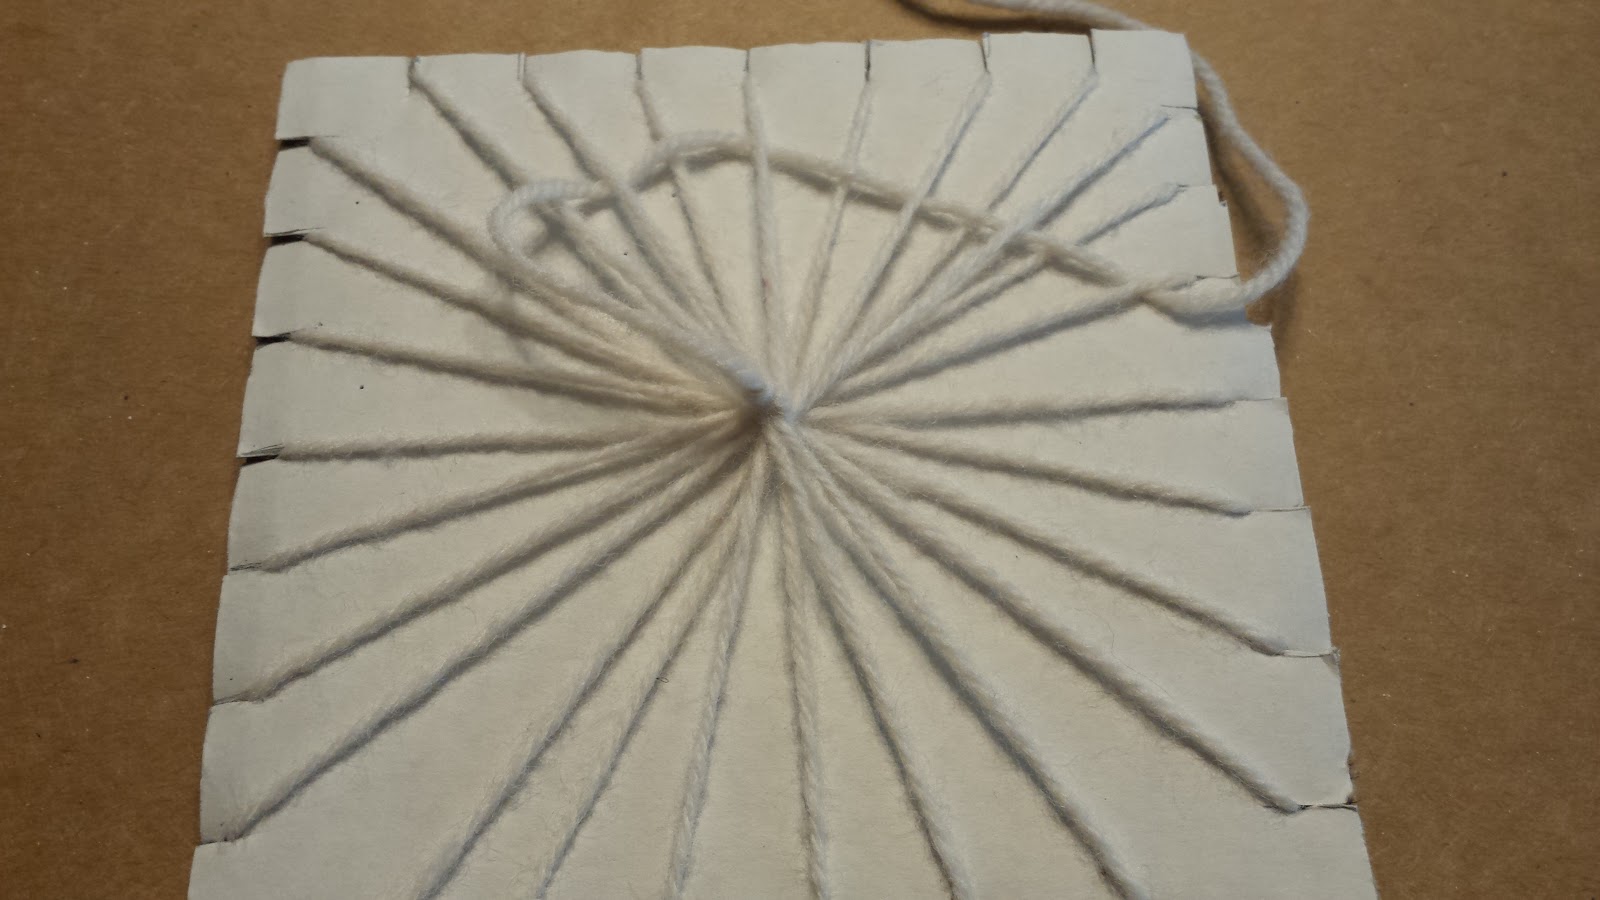
Keep going until you are happy with it. 

Another Cassie Stephens video series explaining how to do this, again it is a little different then mine. 


Tube weaving

I have every intention of putting process photos of this up. I just didn't have time to get to it. You can watch this video here to see how to do this type of weaving on the plastic loops. It is the same as on the tubes, just bigger and nicer. I think she makes casting off more complicated then she needs to, but over all it is a good video.

Cardboard loom weaving
You don't have to use cardboard! You can buy chipboard looms that are already notched. I happen to have a ton of cardboard in my life, and no space to store chip board looms.

Start with the size you want

Measure notches, I like them to be about a centimeter apart.

Move the ruler to the bottom, don't flip the board, your notches will be crooked. cut your notches

Start your warp strings with the end of your yarn on the back side.

Your loom will look like this on the front.

If you want fringe on the ends of your weaving your backside should look like this.

If you want to be able to just take it off and be done make your yarn go around the notches and look like this on the back.

Make a "Cartoon" or "Map" of what your weaving is going to look like to keep everything on track.

Slip the cartoon under your warp strings.

Begin weaving! If you need more dexterity you can use a blue embroidery needle, or tape a Popsicle stick to your yarn and use as a needle.

Make sure to "Beat in" the weft with a tongue depressor aka "Beater"

See how the cartoon helps guide your weaving.

Here is a NEAT video that I just found and will be showing to all of my 4th graders before weaving from here on out. (Uses some vocabulary that doesn't match the standard, but very cool stop motion.)

Hemp Jewelry

There might be some disagreement about weather or not hemp jewelry/ macrame should be included in a weaving presentation, but personally I am always ending projects with 5th grade at weird times, and need something for the last few days right at the end. We don't always get there, but when we do it is so much fun. I did not take process photos when I made my samples, but here are some videos that would explain the whole thing better then me anyway.

Making a wish bracelet would be a good easy way to introduce this project, pretty much every 5th grader knows how to braid. Once you get into real macrame you have the spiral knot, the slightly more complicated square knot, and the much more complicated alternating square knot. Here is a text website with process photos of the first two, if you would prefer to not look at a video.

To finish the whole thing off you have a few ways to finish off a macrame jewelry piece, and a sliding clasp if you are feeling fancy.

For more resources you can also visit Susan's Wiki. She first taught me several of these techniques so you should check that out.

And here is a basket weaving I did once.

Friday, August 8, 2014

Printmaking TAEA

Hello Region 13 Mini conference people! If you made it to our workshop thank you! If you made it here because you heard good things welcome! This post is by no means complete. I will be updating it after the presentation with photos of the couple of processes that we did not have time to re-make for photos.  I am also going to update as soon as I figure out how to link a document in Google Drive to this so you can have the lesson plans digitally. Of course you don't need the lesson plans, because these methods can be used in any lesson you make up. Let me know if you have any questions or want to add anything helpful.
-N.L. & D.C.

Block Printing

For both process below, to finish the project, ink the block with a brayer then print on paper using either a baren or printing press.

 Linoleum-Once you have decided on a design you would like to carve, draw the design on the piece of linoleum with a washable marker. Keep a wet sponge or paper towel handy so that mistakes can be “erased” from the block.  Your design will be a mirror image, so keep that in mind if including text. Next decide if the area you drew is going to be carved away, or if the negative space is going to be carved away. Once you have decided, begin carving with the cutting tool, away from your body. Go slowly, and try to keep the tool steady…sometimes the tool can jump if your carving is inconsistent.  A bench hook will keep the linoleum still while cutting without putting your fingers in danger of being cut. Here is a link and another and another to more info.

Carving along the drawing

Rolling with the brayer

Using a spoon as a barren
The print!

Foam- Once you have decided on a design you would like to carve, draw the design on the piece of clean foam (like a meat tray) with a washable marker. Do not press too hard, sometimes the marker can create a dent in the foam. Also be careful not to lean your body weight on the foam, as that can also leave dents.  Keep a wet sponge or paper towel handy so that mistakes can be “erased” from the block. Your design will be a mirror image, so keep that in mind if including text. Next decide if the area you drew is going to be carved away, or if the negative space is going to be carved away. Once you have decided begin carving the design with a wooden stylus or a ball point pen, being careful not to dig completely through the foam.


Drawing with marker

Digging in with pen. use short strokes so you don't tear the foam.

Ink is rolled out

The Print!

Collagraph
Used by Artists such as Romare Bearden and Glen Alps, this is a process that became popular during wartimes in the USA due to lack of metal. You can use a brayer or paint brush or even rags to get the ink into the places you would like on your plate.  If not using a printing press to print, put some newspaper between the paper and your hands while printing for a nicer result. Here is a link and another to info.

Cardboard- Use varying types of cardboard to cut out and create a design. Arrange cardboard on a larger piece of cardboard or thin wood and glue down. You can also use pre-cut adhesive fun foam or thin found objects to make this project quick and easy for younger students.  It is recommended to varnish the plate if you plan to reuse it multiple times. 
Cardboard with glue as a varnish.

Ink rolled out.
Use a rag to get ink into the nooks and crannies.

The print.


 Glue- On cardboard or thin wood draw your design with pencil, then trace with glue. Tacky glue is recommended, but any think glue that doesn't spread easily will do.

A collagraph with glue
Other materials- You can use anything to make a collagraph as long as it is not too thick, and you varnish it before printing.
Fun Foam

Organic found objects. 

Oil pastel- On glass/plexi glass/ or lamented paper draw a design in water soluble oil pastel. Using a sponge, wet a piece of paper then put the wet side down on the image. Using a sponge wet the back side of the paper that is face down on the image. Rub the back of the paper with your hands or the back of the spoon. Peel up the paper and let dry. 

laminated paper.
drawing with water soluble oil pastel.
Wet the paper
place wet side down and wet paper again.

The print!
If you know a way to make the pastel print work better let us know. 

Ink- 1. Roll a thin layer of ink on glass/plexi glass/ or laminated paper. Place paper on top of ink, and carefully draw an image on the paper without putting hand down. Peel paper up and you should see the image that was drawn on the back in ink on the front.

rolling ink on laminated paper.

Careful not to lay hand down when drawing

The result with too much ink. 

The result with a thin layer of ink
 2. Quickly paint a design on glass/ plexi glass/ or lamented paper with printing ink. Place a piece of paper on the painting, rub with hands, and pull paper up.

Painting with ink on laminated paper. 

Press paper into ink.

The print!

Screen- One inexpensive method of screen printing uses fine a mesh such as tulle or pantyhose pulled taut in an embroidery hoop. The design can be drawn directly on to the mesh or traced from a pre-drawn sketch. Use Mod Podge, glue, masking ink, or acrylic paint to mask all areas with that you want to remain white. After thoroughly dry, draw a line of ink across the top of the image and carefully squeegee the ink down in a single stroke, if possible. An old credit card or hotel room key can be used as a squeegee. Carefully lift to reveal your image.
Tulle pullet tight in hoop

Draw design, block out areas you want white

Paint area on top of wax paper! (wax paper not shown :( )

When paint is dry lay down ink and pull through with credit card or squeegee (even a rubber spatula.)

The print!
Found object- Just as the name suggests this type of printing is created by finding objects in the environment, dipping them in ink or paint and printing on paper. This creates some very nice backgrounds, but can also be used as the main focus.


 Gyotaku- You can use a real fish or rubber fish. Students can use a brayer to roll ink on the fish or a paint brush. After the fish has been inked take a piece of lightweight paper and place it on top of the fish.  Then rub the body of the fish with the palms of your hands and “tickle” the fins with your fingers to get all the parts of the fish on the paper.  Optional: Have the students create stamps out of foam, and print them red in the corner and sign their name. Here is a link and another for more info.

Roll out ink on fish

Rub the body and "Tickle" the fins. 

The Print!

Signing prints
When your print is dry you are going to want to sign the work. The proper method of signing prints is directly under the print using a super sharp pencil. Align the title to the left, and your signature on the right. In the middle you address the type of print that you have created.
AP- Artists proof. This is good for a trial run of a print, a first print, or if only one print was made.
3/20- The number the print was made in a series. This is the third print in a series of 20.
MT- monotype
Signed print!