Today I presented my surreal self portrait lesson at the
TAEA mini "get connected" Tech Conference. For those of you that made
it THANK YOU! It was the first time I ever presented anything, and I loved the
enthusiasm. Here is my lesson plan for anyone that wants it.
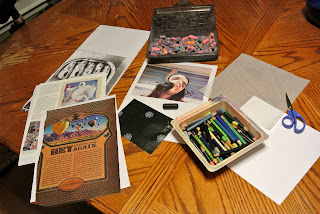
I didn't realize until I packed it all up, but this takes a lot of supplies! You will need:
Magazines with interesting images, 8x8 white paper, 8x8 tracing paper, print out of your face (computer and printer help here), carbon paper, chalk pastels, colored pencils, scissors, glue, black crayon or sharpie, and a pencil.
-->
I started this project off by showing the kids examples of
surrealist art. I brought in some imagery from Salvador Dali, Marc Chagall, and
my favorite Rene Magritte. we talked about the unconscious mind, and how much
surreal art seems random.
-->
We capitalized on the random part of the imagery and
used magazines as source material. I found lots of good content and cut
it out so the kids didn't waste time going through pages and pages of things
that they wouldn't use. I also photocopied and enlarged some good small things.
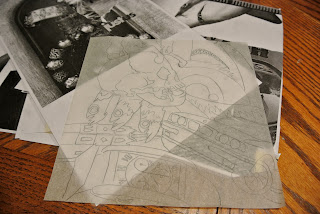
After picking imagery the kids traced it onto the tracing paper. I encouraged
them to think about balance in their artwork, to overlap objects and rotate
their paper as much as possible.
-->
After filling the page with tracing color in the whole
page with chalk pastels. any place you don't fill in will be white, so I tell
the kids not to leave any white spaces. I also recommend they balance their
color choices so one side of the page doesn't get too heavy.
This is the tricky part. You want to glue the side
that you chalk pasteled down. Put a line of glue around the edge of the tracing
paper on the same side that you put the chalk pastel. Then flip the paper face
side down onto the white paper. You will now view your color through the
tracing paper. This is nice because you don't have to spray fix on the pastel,
and it won't smudge. It also has the added benefit of making everything
backward, which can be weird. the muted colors give it a nice Chagall color
scheme.
--> The unfortunate side effect is now you can't really see the lines in your background, so I trace over them with black crayon, or sharpie if you want. Now the background is done and you can work on the portrait.
-->
This is the Tech portion that got me to present at the get connected conference. Take your picture with photo booth. Photo booth comes standard on all Mac's, and you can get the app for ipad and iphone. I know there is an equivalent for PC that you can download, but I don't know its name, so if you do, comment.
On the 2nd page of effects there are some that distort the face. I would recommend any on this page other then light tunnel, fish eye, and normal. Click on the one you want, then click the red camera button to take the picture. Now print the photo.
-->
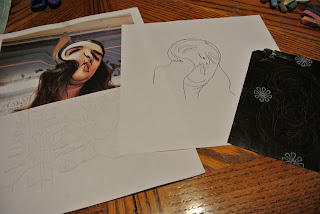
My printer prints on about half a page as is pictured above. I had the kids just cut the bottom off the page and use that, but you can use another piece of paper if you like.
-->
My carbon paper has flowers on the non carbon side, so for me I layered the white paper, carbon paper flower side up, and the photo. now all you do is trace the features of your face. It is important you trace right on top of the features and not go around the features. This makes it look more like what is in the photograph. I like this because it gives the kids just what is there, but because it is distorted they can't get in the "it doesn't look right" trap, because it is supposed to look wrong. Make sure they get their shoulders in, otherwise there will just be floating heads.
-->
Now color. I have a color printer, so since they had
the reference of proper colors I had them color realistically, including
shading. I use prismacolor colored pencils which blend well for shading, but
you can use any type and they will look fine. Now cut out the head.
-->
Ok, we have reached the end of the journey. Glue the head onto the background. I have the kids turn the paper until they find the perfect spot on the background for the head to fit.
Obviously you can change this project to suit your needs, but please, give me credit!!!! I spent some time coming up with all of this!
Now for the boring teacher details:
objectives:
The Learner Will (TLW) view and discuss surreal artists.
TLW pay attention to detail.
TLW use found imagery in an original piece of art.
TLW blend with colored pencils.
TLW use a computer to take a picture.
TLW create a self portrait.
Evaluation:
Students (Ss) have traced background neatly and paid attention to detail.
Ss colored in the background fully.
Ss use bold coloring on faces.
Ss use shading on faces
Ss create an effective composition.
The Artsy Girl
The Artsy Girl


No comments:
Post a Comment