Tuesday, January 17, 2012

Felt tie blanket

I like to give handmade gifts. They take more time, but I enjoy them. People seem to appreciate them more.... or they know you spent time making it and are polite enough not to say that they hate it. Either way, I like it. I made four blankets for Christmas presents this year. One Dallas Cowboys quilt (file that under the things I made last year that I didn't document in any way) for M's grandfather, and three felt tie blankets. These are incredibly easy to make, so I thought I would give a quick how to. Or you can just buy a kit and read that... Whatever, mine has pictures.


I bought this kit. You don't have to get a kit, you are reading this tutorial! I usually don't buy kits because the fabric is generic, or Disney characters I haven't heard of. This is a plus if you are into that sort of thing I guess. The other plus of a kit is it is usually cheaper then buying the fabric separately, and it comes with everything you need. This might not be true for every fleece fabric, I tend to buy sports team logos which may cost more. I got a kit because I was making this particular one for my cousin's new baby, and I don't know what kinds of boy things she wants to promote, or what teams she or her baby daddy boyfriend like. I figured generic sports was my best bet here.

If you don't get a kit you need to get a decorative piece of fabric, and a solid piece that complements the colors in the decorative piece.  The kit size is 48in by 60in, but you can use math and proportionally size up or down depending on what you need. or do what I do and eyeball the length and width proportion. (This really only works when going down in size.... or I ask M. He is a math teacher after all.)


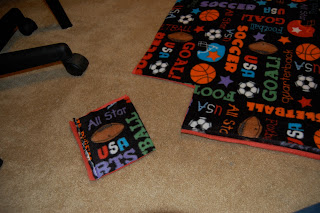
First thing you want to do is lay the two pieces of fleece out wrong sides together. This can sometimes be hard to tell with fleece, but if there are words on it, you want to be able to read them.


Go to each corner and cut a square out. The size of the square will determine the legnth of your fringe so make sure you are thinking about that. Keep those squares. You might want to make mommy a matching flower for her coat.


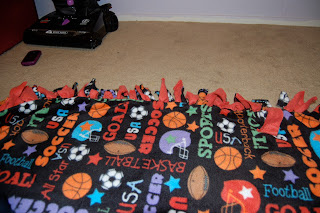
 Now go down the edge and cut into the felt every inch, the same depth in that you cut the squares. Pay attention, its easy to get the spacing three inches apart and veer deeper or shallower. then you mean to, and then you will have a lopsided blanket.


 Do this until your whole thing is cut up. If you have been working on the floor go stretch.


 Now its time to tie. When I tie I like to make the bottom color end up on the top of the tie. That way you see the accent color on the top. You might need to experiment to get it just right, or you might not care. I take the bottom strip and send it to the right when I tie. Is that confusing? Oh well, you'll figure it out. Tie it twice.


Once you have one side done you might notice that it is bunching up a little, especially on the sides. gently stretch it a little. This will make it easier to do the other sides. 


Now you are done! Yay! isn't it cute? No?


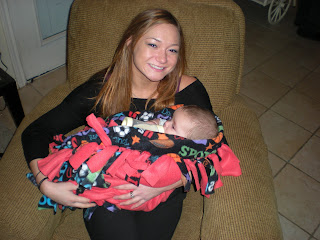
How about now? Dom loves his quilt, or he loves when his Aunt Mah feeds him.


Elliot thought his was a wrapping for his real gift. He'll thank me when it's cold out.

Hope this helps you make someone warm and happy too!
Until next time.

Monday, January 16, 2012

Craft room

I was looking around in my photos and realized that I took pictures of my craft room last time I cleaned it. Thought you might like to see my multipurpose room.


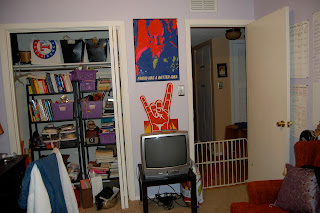
Here is the view from the door. As you can see it is jam packed with stuff! The window box is filled with cat stuff, i.e. food bowl and litter box. We call this Bowser's room.


OK, the main crafting and art making area. That drafting table was like $200 online, I think the brand was Alvin. the desk with the sewing machine is from Sam's club, and the fling cabinet matches. There is an old school overhead projector that I saved from the dumpster at school when a storage room was cleaned out.  The sewing machine is a Babylock Molly. I thought about going more digital, but I figured that I am pretty astute when it comes to taking the machines apart and trouble shooting issues, and that knowledge goes out the window when you get digital. Notice the small guitar, this is also M's music storage room.


The bin's are full of  fabric, and odds and ends like empty bottles that can be used for crafts. That orange loveseat is really a bed for Peach. Not that we ever let her in here, so its a place for people to sit when I make them stuff, or crash when drinking too much.


That TV is not hooked up to anything. I wish it was sometimes, but I can just watch Netflix on my laptop if I want to create and veg. That closet has shelves from Ikea in them and hold all the supplies for creating, along with books. tucked back in the corner where you can't see are all my gift wrapping stuff. 

Yes I know, my craft room is very sad :( someday I will have one that is either large enough for a big table in the middle to create on or that I don't have to share with the cat and all of M's stuff. I want to make a display board for quilting soon, but where will it go?

Time to think!

Saturday, January 14, 2012

Curtains Finally.

Over Christmas break I finally got around to making window treatments for our condo. Yes, we plan on leaving in favor of our very own house someday soon, but M's Grandmother plans on moving back in now that we have the place all fixed up, and I couldn't let her come in with no matching curtains.


Well, they are really valances I guess.  I hear that valances are out of style in home decor these days, but when it comes to something so costly and time consuming to change as homes I say if you still like it who cares.

I told my mom I made them and she said, "hem and pocket?" Yep that's just what I did, but if you are a novice or don't speak "my mom" here is a quick how to:


 I bought a satiny material a few months ago that has a nice texture on one side and a shiny back side.  When I started I kinda forgot that it was satiny and kicked myself when I started working. This isn't the easiest  to work with, and I try to avoid it when I don't NEED to use satin, but oh well.


 The first thing I did was to cut the fabric into strips that were 20 inches wide. I bought 2 yards. of this fabric, and my big window is about 2 yards across so I needed 4 yards of 20 in wide fabric to make my valance scrunchy. My 20in measurement across was completely arbitrary, it just worked out with what I had, which cut three 2 yard strips, and I needed two more yards for another smaller window in the room, so it seemed perfect.  Like my math?


The first thing I did was iron out all the strips, then sew two together for the big window. I pressed the seam just to be sure. 


Then I went to the edges and pined them down, steamed them closed, as satin hems can be tricky, and used a baste stitch on the machine.


 Now time for the "pocket" which is basically a large hem. I think I folded it over so the pocket was 2 1/2 inches wide. I tucked in the fraying end to make it look nice. Yes, I would normally have done that for the hem on the edge too, but the satin was being too finicky.


 Pin and iron all the way down the 4 yards of fabric.


Now sew with a baste stitch. I like to bunch my long fabric up like this so I have more control. (Don't ask about all the glue guns.) Make sure you leave the ends open so that you can slip the rod into the pocket.


 Now for the last bottom hem. For this it really would be wise to tuck in the frayed edges. I spent 2 days when I finished cutting frays that came loose off of the valance. But alas, I got caught in the "I'm almost finished" rush and cut some corners. Luckily no one will be inspecting my work.


Here it is in natural light. I put them on some white rods. So sorry I didn't take pictures of how to slip them in the pocket, but I bet you can figure it out.  I'm sure you can use any kind. I was lucky that there were brackets stuck in the wall when we moved in, and I recognized them as the kind that support the white rods that my mom just replaced in her house. Rather then taking them out and buying new rods and having to re-level I just used the leveling some unknown person did once, and dug two rods out of the trash at her house.

I think these look really nice, despite that my Realtor aunt says that they are outdated. They add some warmth to the room. If I were the kind of person that kept track of the cost of projects then I would say this was about $20.00 since I just had to buy the fabric. But it may have been less then that.

Until next time.


Tuesday, January 3, 2012

Lern to sew!

I taught myself how to sew when I was 8. By that I mean I asked my mom how to thread the machine, and through lots of trial and error eventually figured out how to use it to make barbie cloths out of the ends of my pants that mom cut off when I got too tall. I didn't learn to hand stitch till home ec. in middle school. Now I teach hand stitching to 3rd graders.... because I think that is the right age to learn sewing.  At the begining of the lesson they always ask, where do you keep the machines all year? I laugh and tell them that the only thing they need a teacher for on the machine is to learn how to thread it. Maybe I'm being cocky. If you think I am, and want to learn how to sew head on over to Tilly and the Buttons who is doing a tutorial series about sewing using a machine. and yes the first lesson is how to set the machine up. So if your like me, just read that one. I'll be reading the whole thing. You never know, there might be gaps (likely) in my informal sewing education.

Later.


Sunday, January 1, 2012

An open letter to Broke ass Bride

Dear Broke-ass Bride,
I really like you. I really like your ideas, and your ideals that weddings can be something glamorous and wonderful with out breaking the bank. As a person with a wedding budget I totally love what you are doing.  I have really been trying, so don't hate me when I say


Weddings on a budget are hard.

I know that there are better places to get a wedding dress then a small boutique. I KNOW. But as a person who has never shopped for a wedding dress before, and really dislikes buying things from websites that are relatively unverified I just couldn't bring myself to buy that dress that was supposedly $200 on that possibly Chinese website. So I bought this.


Casablanca 1936


It came from a tiny boutique that I drove by a few times. Yes I know there were other options. But at the time I didn't know about that wedding dress exchange site, where I bet I will be selling this dress after the wedding.

I tried David's bridal where I was treated like dirt because I only had a vague idea of what I wanted.  OH and god forbid I ask the sales girl what she thought might look good on my body type. I've worked retail, I get it, but common courtesy when a non-briedzilla comes in wanting an opinion would be nice.  (That lady is still calling me.)

I also went to a fancy place thinking it might be nice to be pampered, but that lady was so pushy that she didn't care what I said I liked (or had already tried and knew looked bad), she brought me whatever was 1000 over the price I said I could pay.

So I think the $800 trunk show price I paid for a dress that had to be ordered from England and took 7 months to make is pretty good.

My photographer, while a friend I have known forever, is a professional wedding photographer, so that cost a TON. (I won't talk prices there, as she is a friend, and I knew what I was getting into.) But I decided early on that a good photographer can make a crappy wedding look amazing, so the price was whatever.

Be proud of me here Broke ass bride! After my original wedding reception venue  tried to tack on an extra $2000 that wasn't quoted to us (they did it while we were about to sign the contract, so we just got the deposit back) I changed my reception venue to the church hall, which will cost a whopping $150! We can bring in our own ANYTHING, so money saved on booze and....

Food. My friend's brother owns a gyro (yee-ro) trailer in town, and has not just agreed, but offered to do a gyro bar buffet at COST!!!!

I booked the same DJ as M's sister, which gave us at $100 discount. They threw in a free light show because they happened to be one of the bad original venue's preferd vendors, and are letting us keep it, because its not our fault that the other people are jerks.

Bridesmaid dresses were easy to do cheap. I found some great ones on clearance at Anthropologie for $53 each. and they turn from dresses into skirts.


The thing that has been hard is impulse things. Like my engagement journal, and Handmade weddings, and this book I found on making invitations.  With any luck I'll keep these under control.

Thanks for listening