Monday, December 10, 2012

Tree Topper

My Hubby is a little obsessed with tradition. Even things that he thinks tradition that really (In my opinion) are not. Example? His family has a home made star on the top of the tree. Now it seems to me that his artsy Dad probably made it just for fun, or maybe they decided to make one rather then spend much needed money on a store bought one. Either way, they have used the same home-made star for the past 30 years. There is nothing wrong with this, its a cute star, but it means I CANNOT buy a tree topper in the name of tradition. The last 3 years we have had a bare tree top.

This year we have a house, and I was able to use our vintage aluminum tree as a themed blue and silver Dallas Cowboys tree like I have been wanting, because we had space for a real tree too. I had the best idea for a topper. Here is how I made it. 


Supplies: A piece of cardboard in the shape of a star (or angel, or Cthulhu, whatever suits you.) Paper to cover it with, glue, Mod-Podge, Scissors, a brush ribbon, and a photo.  The photo is totally optional, but helps add interest. M's parents have a family photo from the year his sister was born in their star. you could do an angel, Sweet Baby Jesus, H.P. Lovecraft, whatever. I chose Tom Landry, because it is a COWBOYS tree.


Cut out your photo, and cut up your pieces of paper. Yes you can do it in one sheet, but it will be harder, and this covers up mistakes. I highly suggest that you cut some strips for the edges and fold them in half long ways to wrap around the outer edge.  It will hide the raw edge of the cardboard, and make your life easier if you want to decorate both sides. (I didn't decorate both sides.)


Glue the pieces of paper on the cardboard. yes I know you can just use Mod-Podge, but I am suspicious of it, and this seems more secure. Plus if you are wrapping paper around the outer edge it is just easier with regular glue. Mod-Podge the whole thing, getting the brush under the fly up edges.


 If you are putting a photo on the star, get it on there before the Mod-Podge dries, and cover it with goo too. Let dry.


Once your star is dry you can add a ribbon to the back. (Sorry I didn't take a picture of this before M put it on the tree, which I can't reach.) I just took  thick ribbon and hot glued it to the back. I left a tiny amount of give to get it on the branch, but it is still pretty tight across the back. 


Have a tall person put it on the tree and enjoy!

The Artsy Girl

Monday, November 12, 2012

Sub Plans

This coming weekend is TAEA, and I am super pumped! I am going to be out on Friday to take in the workshops, and that means  I have to make sub plans. I have a pretty sweet system for my emergency plans, and I thought I would share it with you, as I just now in my 3rd year got it to a place I like.

 I have a skill box on the shelf behind my desk that is full of emergency lessons, they are all super easy to do, and understand, and don't take any more materials then what I keep in the tote trays on the tables, so the sub doesn't have to get anything weird out, or search through my stuff.

That blue folder above the sub lesson box has all my info about schedules, seating charts, emergency info etc, so I can be out without having to worry about a thing, it just takes a few moments to update at the beginning of every year.

 The folders in the box each have a whole days worth of lessons for each grade level. I used to have each activity in a folder, but I had a hard time remembering what class did what the last time I was out. This way if I am sick and can't write plans the sub can just pull out one folder, and do what is in there.

On the front of each folder is a sticky note that says A, B, C and "Clarke" This is because we have a three day rotation, and another teacher, Ms. Clarke who travels to our school every third day. When a set of lessons are used on a day, or by Ms. Clarke it gets checked off the  sticky, so anyone can tell weather or not a class has done what is in the folder. If a folder has the day checked off, just go to a folder that isn't checked off.


Inside the folder there is a set of "masters" that are paper clipped together. on each master there is a sticky note with instructions about how to do the activity, suggestions on how the sub can teach a mini lesson (if they feel inclined to do more then read the directions) and a suggestion for early finishers. I always leave a pile of copy paper for "free draw" if a student finishes the activity early. I try to have enough copies of each activity for a class in the folder, but that doesn't always happen, which is why I have the masters papercliped together, so they don't get handed out and can be re-copied

That's it for today! Conference is putting me in a sharing mood, and I hope to have lots to share after. What are your favorite sub lessons? Would you like me to share the ones I use?

Later,
The Artsy Girl

Tuesday, October 9, 2012

Woven Basket

My first year teaching a parent gave me a donation of stuff to make baskets with!  She said I could just take it home  because she knew there wasn't enough to make a whole class worth.


Now, I am very aware of the stigma that art and basket weaving have, particularly together, so I had never planed on teaching this during a textile lesson.  Then I read the Hunger Games.  How can someone say that basket weaving is useless and lame when Finnik wove watertight baskets in the 2nd book that saved everyone's life, because they could now take water with them? HOW I SAY! You can't. I know If I related a basket weaving project to that my students would be OBSESSED with baskets. Maybe someday, but I'll be on maternity leave when they do textiles this year.

The directions that came in the bag I got were very... unclear, so I looked up how to do them. rather then take process shots and make a tutorial, I decided to direct you to the totally awesome one that I used.

Here is my finished product! Yeah OK, It's ugly, but it holds onions and potatoes nicely, which will do until I am able to have a root cellar, or figure out a better solution in the pantry.
I might have enough left to make some baskets for the baby's room to hold toys.

The Artsy Girl

Saturday, April 21, 2012

Photography part 2

As promised, here is the black and white.
Oh looky there. Something labeling this as mine. That web art class was baller. I need to do this again.


This photo made my professor say I was his most promising student <3


The one thing I miss about my ex from several years ago? His roommate. This guy. I hope I gave him a print of this.

Photography.


One of my main concentrations in college was Photography. It wasn't official or anything, because as education majors we were technically not supposed to pick an art specialty (or maybe I just thought it was a bad idea in an effort to spread my wings for the sake for the kids.) Anyway, I told a parent about this, and she asked me to photograph her kid, and I said yes! Maybe this can be a side gig?

Well I have a long way to go, and my college professors would be really disappointed in me right now. Like a bone head I uploaded through iphoto rather then photo capture, and it compressed all my photos. Of course I didn't realize this until after I had deleted the photos off my memory card. Ugh. Even though most people would never notice, I'm gonna come clean and offer to not take payment. If anything it was a nice afternoon with kids and a parent I like, and I'd rather think of it that way then be racked with anxiety about her finding out and telling other people that I'm handing out too small files.

anyway it got me to thinking, I haven't shared any of my photography here. I'll put some Color in this post, and then some Black and white in the next post, as I am sure Blogger will not accept that many photos.


One of my flower girls.


Just a taste.
The Artsy Girl

Tuesday, April 17, 2012

Groomsmen Gifts -Etching Glass

 M is planing on paying the tux rental for his groomsmen gift. While this is very sweet, as many of his groomsmen are students, I think they deserve a little something tangible.

You could probably fit most of a 40 in here.
I found these awesome oversize beer mugs at the dollar tree, and a light went off.  I snatched up enough of them and headed to the craft store to find supplies for glass etching.  I have always wanted to try this, and have seen tutorials over the years, but was a little unsure.


First thing you are going to need are some kind of barrier to block out the area you don't want etched. I used tape and stickers. I have seen places where people used things like puffy paint too, anything that will create a seal that the etching cream can't get under.


I carefully lined up the name of the groomsmen on the glass, and then outlined it in tape. Wish for your sake the tape was colorful, look closely you will see it. Make sure to rub hard so it really sticks.


You can do it the other direction too, if you like. I think it looks better this way if the name is really short. (I also did both sides.)


This is the magic stuff you need, Armour Etch. Apparently there is a product that fake etches things according to the sales girl. it puts a residue on the glass rather then scratching the glass. This is the real one. The directions even say not to let it in contact with your skin. That is also the extent of the directions on the bottle. I went to the website and no luck there. The rest I had to pretty much figure out on my own (because dangit of I couldn't find any of those tutorials again! Oh the days before Pintrist)

Brush it on, not like this. This stinks.
Grab a paint brush and brush the etching cream into the area you want etched. in this pic it is kind of dabbed on, DO NOT DO THAT. The etching comes out blotchy. Brush it on evenly, maybe a couple of times. Leave it for about 10 min. It is going to smell like rotten eggs. Ew.


After 10 min rinse the cream off with warm water. Bonus of warm water, it will take the stick off the stickers and tape.


Now were done and you have some awesome custom made beer stein.

Hope you like it!

The Artsy Girl.

Saturday, March 31, 2012

Surreal self portraits.- TAEA

  -->
Today I presented my surreal self portrait lesson at the TAEA mini "get connected" Tech Conference. For those of you that made it THANK YOU! It was the first time I ever presented anything, and I loved the enthusiasm.  Here is my lesson plan for anyone that wants it.

  -->
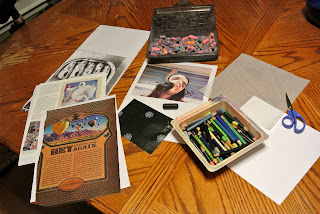
 I didn't realize until I packed it all up, but this takes a lot of supplies! You will need:
Magazines with interesting images, 8x8 white paper, 8x8 tracing paper, print out of your face (computer and printer help here), carbon paper, chalk pastels, colored pencils, scissors, glue, black crayon or sharpie, and a pencil. 


-->
I started this project off by showing the kids examples of surrealist art. I brought in some imagery from Salvador Dali, Marc Chagall, and my favorite Rene Magritte. we talked about the unconscious mind, and how much surreal art seems random.

  -->

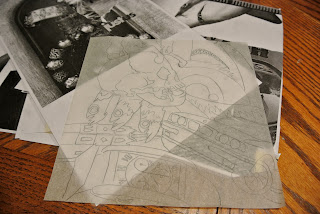
We capitalized on the random part of the imagery and used magazines as source material.  I found lots of good content and cut it out so the kids didn't waste time going through pages and pages of things that they wouldn't use. I also photocopied and enlarged some good small things. After picking imagery the kids traced it onto the tracing paper. I encouraged them to think about balance in their artwork, to overlap objects and rotate their paper as much as possible.


-->
 After filling the page with tracing color in the whole page with chalk pastels. any place you don't fill in will be white, so I tell the kids not to leave any white spaces. I also recommend they balance their color choices so one side of the page doesn't get too heavy.

  -->
 This is the tricky part. You want to glue the side that you chalk pasteled down. Put a line of glue around the edge of the tracing paper on the same side that you put the chalk pastel. Then flip the paper face side down onto the white paper. You will now view your color through the tracing paper. This is nice because you don't have to spray fix on the pastel, and it won't smudge. It also has the added benefit of making everything backward, which can be weird. the muted colors give it a nice Chagall color scheme.


  --> The unfortunate side effect is now you can't really see the lines in your background, so I trace over them with black crayon, or sharpie if you want. Now the background is done and you can work on the portrait.

-->
 This is the Tech portion that got me to present at the get connected conference. Take your picture with photo booth. Photo booth comes standard on all Mac's, and you can get the app for ipad and iphone. I know there is an equivalent for PC that you can download, but I don't know its name, so if you do, comment.  

On the 2nd page of effects there are some that distort the face. I would recommend any on this page other then light tunnel, fish eye, and normal. Click on the one you want, then click the red camera button to take the picture.  Now print the photo. 


  -->

My printer prints on about half a page as is pictured above. I had the kids just cut the bottom off the page and use that, but you can use another piece of paper if you like. 
  -->
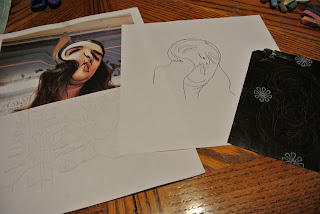
My carbon paper has flowers on the non carbon side, so for me I layered the white paper, carbon paper flower side up, and the photo. now all you do is trace the features of your face. It is important you trace right on top of the features and not go around the features. This makes it look more like what is in the photograph. I like this because it gives the kids just what is there, but because it is distorted they can't get in the "it doesn't look right" trap, because it is supposed to look wrong. Make sure they get their shoulders in, otherwise there will just be floating heads.


-->
 Now color. I have a color printer, so since they had the reference of proper colors I had them color realistically,  including shading. I use prismacolor colored pencils which blend well for shading, but you can use any type and they will look fine. Now cut out the head.


-->
 Ok, we have reached the end of the journey. Glue the head onto the background. I have the kids turn the paper until they find the perfect spot on the background for the head to fit.

Obviously you can change this project to suit your needs, but please, give me credit!!!! I spent some time coming up with all of this!

Now for the boring teacher details:

objectives:
The Learner Will (TLW) view and discuss surreal artists.
TLW pay attention to detail.
TLW use found imagery in an original piece of art.
TLW blend with colored pencils.
TLW use a computer to take a picture.
TLW create a self portrait. 

Evaluation:
Students (Ss) have traced background neatly and paid attention to detail.
Ss colored in the background fully.
Ss use bold coloring on faces.
Ss use shading on faces
Ss create an effective composition.

The Artsy Girl

Wednesday, March 7, 2012

Truth

The Artsy Girl